Wednesday 14 November 2012

Sculpting a low poly character


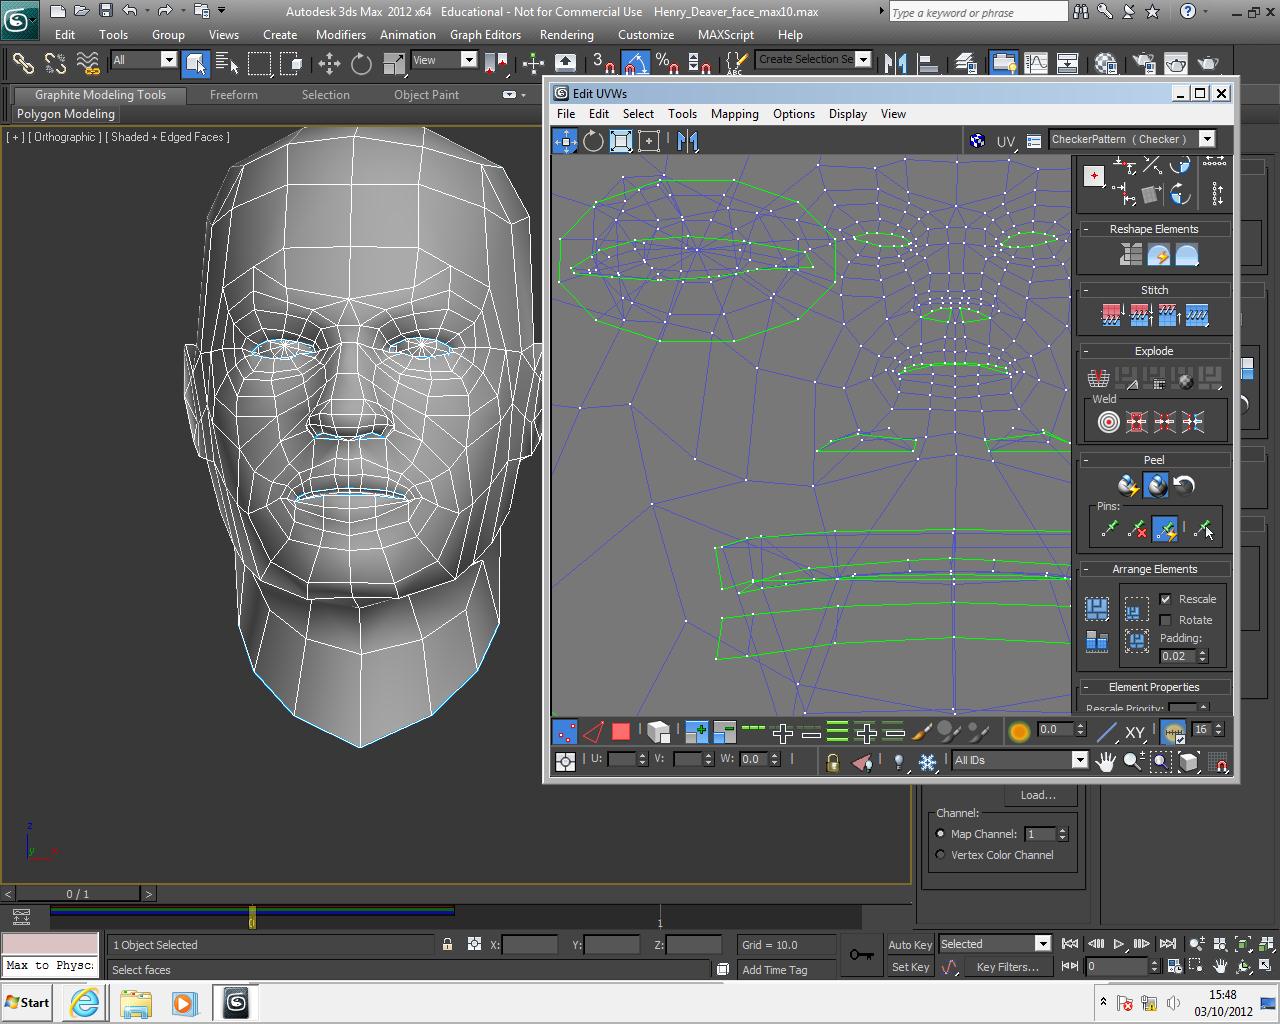
 Before sculpting a character I made one in 3Ds max. I kept it simple and made it low poly. As the screen shot shows the characters basic shape is made out of a box which was converted to editable poly to allow me to make the legs and arms. I made half of the shape and applied symmetry to it.


After making the character in 3Ds max I imported it into Mudbox. In Mudbox I used the grab tool with Mirror on the X axis turned on. Turning the mirror on does the same thing as symmetry in 3Ds max, it copies every change and applies it to the other half of the model. Using the grab tool I gave my character some shape as the screen shot above shows.


The screen shot above shows the difference between the basic shape I made of a character and the character that I exported from Mudbox. As you can see this is a quick method of making simple characters and I also learnt that it is a good method to use for doing things like this. It saves time because I didnt have to push and pull verticies to get the same shape as I would in Mudbox.

Wednesday 7 November 2012

Multi Sub Object


Texturing an object using Multi Sub Object is a good way of texturing 3D models which have more than one texture to them. It makes it easy because all of the different textures or colours for the one model are in one place and it doesnt make it confusing. It is used by applying different ID's to the different polygons of the model.


Texturing, Grass and Mud Blend

 
To get the texture above on a 3d model I got a dirt and grass texture from the internet and made the mask in photoshop. The three images are below are the ones I used for this. In the material editor I chose blend map and then put the below images in there. Doing this it blended all three textures into one as it shows in the image above. I think this is a good method for mixing different images to get a texture. It could be a useful technique for when making terrain and fields etc.


Monday 5 November 2012

Terrain Scene


Today I created terrain using Mudbox and then opened it up in 3Ds max. I then used this terrain to create the simple scene above. I think that using Mudbox is a good way of creating simple terrain because you can create it how you want it. The trees are default trees which can be found in the software.
Doing this I also learnt how windows and doors can easily be added to buildings. They are added to building by using the Boolean tool which is very easy to use and also a good technique for molding and object into another.

Monday 15 October 2012

Modelling a face, starting off with a plane


Here I have modelled a characters face starting with just a plane. I started off modelling this face by creating a plane and then converting it to editable poly. I then created the eye socket following on to the nose and then the mouth. These three facial features where created using seperate planes. I attached all three by using the attach tool. Doing this made them part of the same group. I extruded and connected the edges to get the face as the screenshot above shows.
 
From making this characters face, I learnt how facial features can be made seperately and then joined together using the attach tool.


Wednesday 10 October 2012

Unwrapping


Started practicing how to unwrap characters. To do this a 3D model of an alien was given to me. First of all I started off by putting seams where I thought they were supposed to be. After watching how the tutor did it, I tried doing this myself. I found that the head and torso are the easiest to unwrap whereas the feet and hands are very difficult.


The screenshot above shows how I have created seams along the hand. After following the tips the tutor showed, I started adding seams myself. First of all I added seams around the area where the nail will be. I then created a seam starting from the wrist and ended the seam at the tip of the last finger. I learnt that if I was to create a seam all around the hand then when I was to unwrap it the hand would split into two sections. I also learnt that if a seam is created through the centre of a characters face then when it was to be unwrapped, it would be unwrapped inside out and the front of the face would be at the back.


Doing this exersise gave me the basic idea of how unwrapping works and where seams should be created. I learnt that if seams are created in areas where they are hard to see then it is better for when a texture is applied because the seams where the texture joins will not be visible.


Monday 8 October 2012

Modelling a character


Started modelling a character using blueprints which were already given to me. I started creating the character from the upper body using just a box and converting it to editable poly. I modelled the basic shape of the character using vertex, edge and polygon modes. As the screen shot shows I have got the basic shape of the character, this was all done using the same method and modes. For the head I used a simple box shape and applied the relax modifier to it a few times. I found that applying the relax modifier a few times to a symple box shape will give the basic shape of a characters head. It saved me from shaping the head out from the box shape itself.
 

Before modelling this character I learned about the common modifiers used in 3Ds Max. I learnt how the different modifiers can be used within the software to create different types of models. I also learnt the difference between converting an object to editable poly and applying the edit poly modifier. I learnt that converting an object to editable poly lets you edit an object more than just applying edit poly. Another useful thing I learnt was the different ways an object can be smoothed without using the turbo smooth modifier. For example the Relax modifier can be used to smooth and object while maintaining sharp edges on some of the object. Smoothing groups was also another thing I picked up. This can be used to number the polygons which you want to smooth. This is useful for when modelling cars.

Wednesday 3 October 2012

UVW Unwrap


Here I used Unwrap UVW to texture this milk carton. The model and texture were already given to me. First of all I applied the Unwrap UVW modifier to the milk carton and then on the Unwrap UVW modifier panel I opened the UV Editor. In the UV Editor I opened up the milk carton texture and then selected one whole side of the milk carton. Selecting the one whole side also showed my selection in the UV Editor. I placed the selection from the UV Editor ontop of the texture as the image above shows and rescaled it to fit one side of the unwrapped texture. When I did this for the next side I welded the vertical vertices of both milk carton sides together, doing this joined the seams. I used this method to texture the whole milk carton.
 
Render of the milk carton
 
Quick screenshot of a head unwrapped
 

UV Mapping


The two images above show my understanding of UVW mapping perfectly. I used the 2D image and applied it to the box. I then used UVW mapping to edit the texture so that the edges match up perfectly as the screenshot shows. If a texture was to be applied to, for example, to a box, and it wasn’t changed around using UVW mapping, then it would not look well textured because the pattern would be the same all around the box, this would lead to the texture not matching up on the edges and everything would look out of place. To improve my understanding on this I used a checked texture so that it would be easy for me to see the difference between using UVW mapping and not using it.

Monday 1 October 2012

Creating a jet using blueprints


To start creating the jet I first set up the blueprints. I then created a simple box and then converted it to editable poly. I then made a cut through the middle of the box, doing this gave me an extra edge through the middle of the box. After that I selected half of the box up to the cut I made and deleted the half. This left me with just half of a box. I then applied the symmetry modifier and flipped it on the 'Z' axis. Doing this mirrored the box.


As you can see above I started extruding the edges and started editing the vertices to give the basic shape of the wing and centre of the jet. Switching viewports from time to time made it easier for me to get this basic shape.


The screenshot on the left shows the basic shape of the jets wing which I modelled earlier. As you can see the symmetry modifier mirrors the object so it is a full a model.


After modelling the wing I made a start on the front end of the jet and near enough finished modelling it. I used the same method and tools as the wing.


I found that turning the symmetry modifier on and looking at the perspective viewport from time to time makes it easier for when modelling something because it gives you a rough idea of how the model is looking and how each time you edit something it shows the difference.


This screenshot is the jet when turbo smooth modifier is applied.  


The two images on the left show the Jet with Turbo Smooth modifier applied to it. The difference between these two images and the others is that in these I have created the wings at the back of the Jet. These wings were created using the same methods and tools as before.


Creating a characters leg


Started creating a leg for a character practicing the ring and loop tools. Started the leg off using just a cylinder and then extruded the edges and rotated them to follow the mesh pattern. The leg was created using just a cylinder with the editable poly modifier applied to it.

Wednesday 26 September 2012

Modelling and then texturing a table/desk


Started texturing in 3Ds Max. Made a table and textured it using the methods shown in the morning.
 
Started the table off using just a box with 4x4 edges. Applied editable poly to the box and moved the vertices to the corners to make a square polygon in each corner, this was done for the legs. The corner polygons were extruded and edited to create the legs for the table. 
 
To apply the texture I found a beach wood texture on the internet and then inserted it into the material editor. The specular colour and glossiness were edited to give the texture a bit of shine. For the legs I applied the standard material and edited the glossiness and specular colour to give it the grey/black metalic look.  

Modelling a pick up truck


Started modelling a pick up truck with dale allen yesterday
 
The pick up truck was modelled using the box modelling method. This was done by inserting blueprints onto planes. The blueprints were then aligned using the axis.
 
After setting up the blueprints we then created a simple box. The box was then converted to editable poly via the quad menu. Pressing 'Alt' and 'X' on the keyboard made the box transparent. This is done so that the box is visible as well as the blueprint behind it. To create the pick up truck we edited the vertices and moved them according to the blueprint. Doing this gave us the basic shape of the pick up truck.